
Want to automatically send welcome emails, registration confirmations, or follow-up messages to users after they sign up on your WordPress website? An autoresponder helps you automate communication, improve user engagement, and save time.
With RegistrationMagic, you can easily configure autoresponder emails for WordPress registration forms without writing code.
If you have not yet created your registration form, we recommend first following the RegistrationMagic Starter Guide to learn how to create and publish forms on your WordPress website.
What Is an Autoresponder?
An autoresponder is an automated email sent immediately after a user submits a registration form.
These emails can be used to:
- Welcome new users
- Confirm successful registration
- Share onboarding instructions
- Deliver promotional or follow-up messages
Autoresponders help create a professional user experience while reducing manual work.
Why Use Autoresponders for WordPress Registration Forms?
Improve User Experience
Users instantly receive confirmation that their registration was successful.
Save Time
Autoresponder emails eliminate the need to manually send welcome or confirmation messages.
Increase Engagement
You can guide users toward the next step, such as logging in, verifying their account, or accessing member-only content.
Automate Communication
Dynamic email content allows you to personalize messages automatically using form submission data.
How to Configure an Autoresponder in RegistrationMagic
Once your registration form is ready, you can configure automated emails directly from the form dashboard.
Step 1: Open Form Dashboard
Inside your WordPress admin panel:
- Go to RegistrationMagic → All Forms
- Locate your form
- Click on the Dashboard icon

The dashboard provides access to all form configuration settings including automation and email options.
Step 2: Enable Auto Response
Inside the Form Dashboard:
- Go to the Configure section
- Locate Auto Responder icon
- Click on the icon to visit autoresponder settings
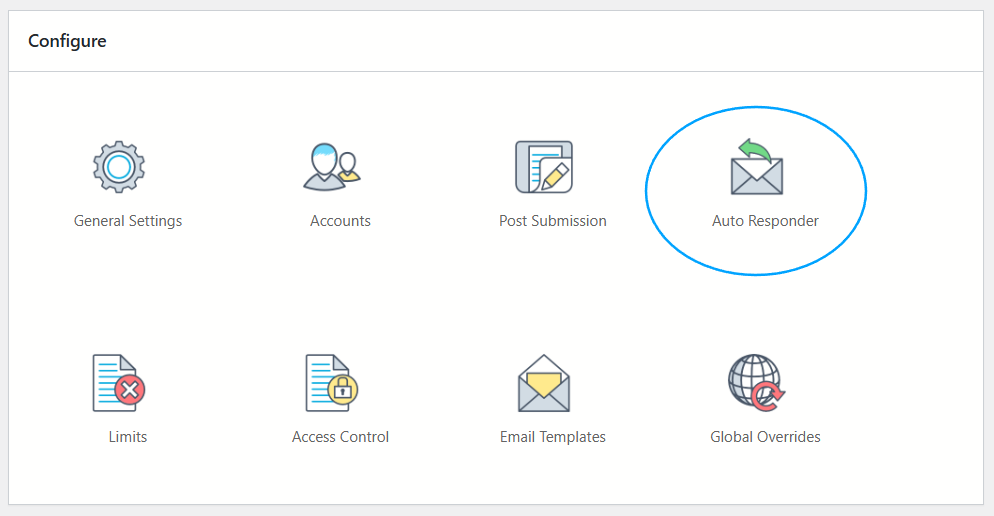
RegistrationMagic allows you to automate emails for every successful form submission.
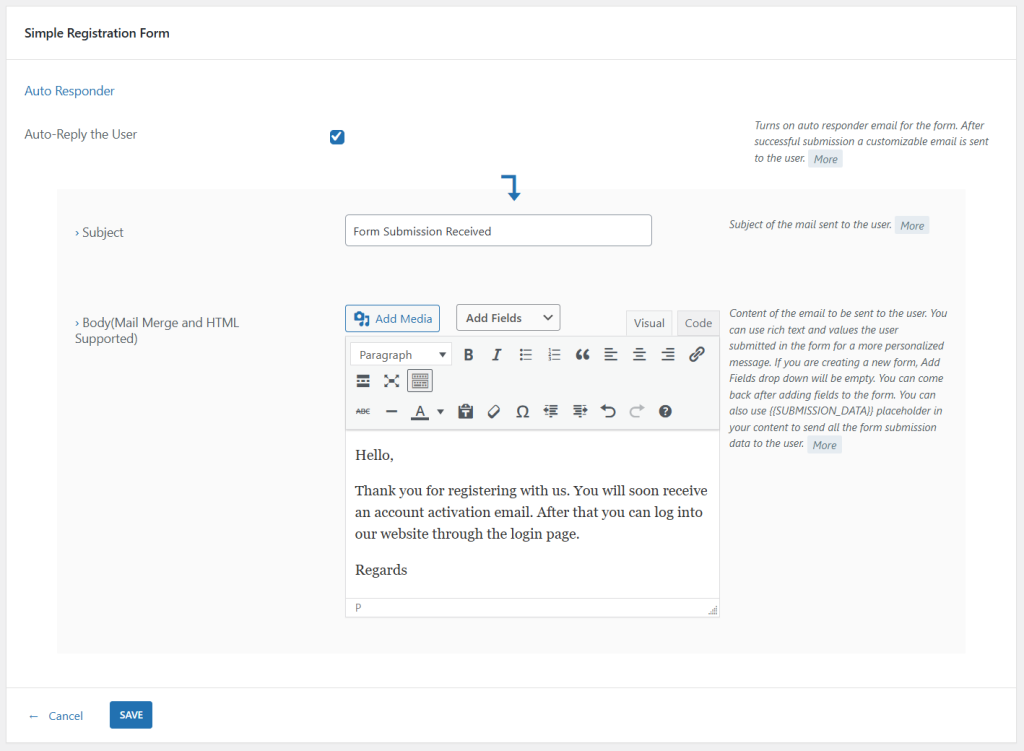
Step 3: Configure the Email Subject
Create a clear and engaging subject line.
Examples:
- Welcome to Our Website
- Registration Successful
- Your Account Has Been Created
A professional subject line improves email open rates and user trust.
Step 4: Write the Autoresponder Email
Now compose the automated email message users will receive.
Example:
Hello,
Thank you for registering on our website. Your account has been successfully created.
Personalize Emails with Dynamic Fields
RegistrationMagic supports dynamic field placeholders that automatically insert user information into emails.
You can personalize emails using fields such as:
- Username
- Email Address
- First Name & Last Name
- Custom Form Fields
Personalized emails create a better experience and improve engagement.
Use the “Add Fields” selector from the email body editor to add field data placeholders in the email body. Also, you can use the {{SUBMISSION_DATA}} placeholder to add complete form submission data in the email body.
Configure Email Delivery Settings
To ensure reliable email delivery, configure your outgoing email settings properly.
RegistrationMagic supports:
- WordPress default mail function
- SMTP email services
Using SMTP is strongly recommended because it improves deliverability and reduces the chances of emails going to spam folders.
Email delivery settings can be changed from Global Settings → Email Configuration settings.
Best Practices for Registration Form Autoresponders
Keep Emails Short and Clear
Focus only on important information and the user’s next step.
Use Friendly Language
Welcome users with a professional but approachable tone.
Add Branding
Include your website name, logo, and support details.
Optimize for Mobile Devices
Most users check emails on mobile devices, so keep formatting simple.
Use SMTP for Better Deliverability
SMTP services greatly improve email reliability.
Common Autoresponder Email Examples
| Email Type | Purpose |
|---|---|
| Welcome Email | Greet newly registered users |
| Membership Confirmation | Confirm subscriptions or memberships |
| Onboarding Email | Help users get started |
| Follow-Up Email | Promote products, content, or updates |
Troubleshooting Autoresponder Emails
If autoresponder emails are not working properly:
- Verify your SMTP settings
- Check your sender email address
- Temporarily deactivate other plugins to identify conflicts
- Confirm your hosting provider supports email sending
Many WordPress email issues are related to server configuration or plugin conflicts. Community discussions frequently recommend SMTP configuration for reliable delivery.
Final Thoughts
Autoresponder emails are an essential part of any WordPress registration workflow. They help automate communication, improve user experience, and keep users engaged immediately after registration.
Using RegistrationMagic, you can quickly configure personalized autoresponder emails for any registration form on your WordPress website.

- RegistrationMagic Starter Guide - May 20, 2026
- Auto Login User After Registration on WordPress Site - May 14, 2026
- Complete Guide to the WordPress User Registration Process - May 14, 2026
- Frequently Asked Questions About WordPress User Registration Forms - May 13, 2026
- Reinvent WooCommerce User Registration Process & Increase Sales! - May 13, 2026
- Invitation Based User Registration on WordPress Site - May 12, 2026
- How to Allow User Registration Multiple Times on WordPress - May 12, 2026
- How to Restrict WordPress Registrations by Age and Other Parameters - May 12, 2026
- How to Register Users for Specific Roles on WordPress Site - May 11, 2026
- How to Add Fields to User Accounts - May 11, 2026
After submission, i did a test and most of the submission will be at the spam folder how to put it into the inbox directly? i already send a ticket
Credibility rating of the messages is not controlled by RegsitrationMagic. Your hosting service provider support team will be able to help you out with this. Also we recommend moving your site to https as it will help generate it more secure signature.
Hello,
how do i display products that have been selected in the email sent out
The users may log in and check it in the PDF they download from the user area. Auto-responder email doesn’t allow for products to be added.
Great post!.
If i like to show the submission id of the form entry can it be done?
I saw some examples like {{SUBMISSION_DATA}}, i wonder if we can use {{SUBMISSION_ID}}?
Kindly advise.
Thanks,
RegistrationMagic allows for token IDs instead of submission IDs.
Submit button not work
As discussed on the support ticket, the issue was related to your local environment conflict and has been fixed now.