Introduction: Manage and Export WordPress Registration Forms Data
Let’s get started on another WordPress registration system tutorial. We will focus on how to manage and export WordPress registration forms data and database. Call them submissions, entries, records or simply form data; every piece of information submitted through forms on your WordPress sites is vital for your business or blog. More disorganized this information, more difficult it will be to make sense of your forms. Good old email notifications simply don’t cut it these days. You may miss a mail, or your server may not shoot the notification message (believe me, that happens) or worst you lose access to your inbox. Therefore, for any plugin that purports form building credentials, it must pay equal importance to the data that its forms collect over time. It should not only be organized but also able to provide meaningful insights into how forms are working.
Manage and export WordPress registration forms data is in the very DNA of RegistrationMagic. Its multiple parts work as a whole to filter and present the information users send out to us. We call every entry a Submission. Therefore, the first and foremost area of RegistrationMagic, after the Forms Manager is the Submission Manager. Before we take a look at the Submission Manager, lets fill out a form to make sure we have at least one submission when we go there.
Sample Form and Data
Here’s a sample form we built on our site:
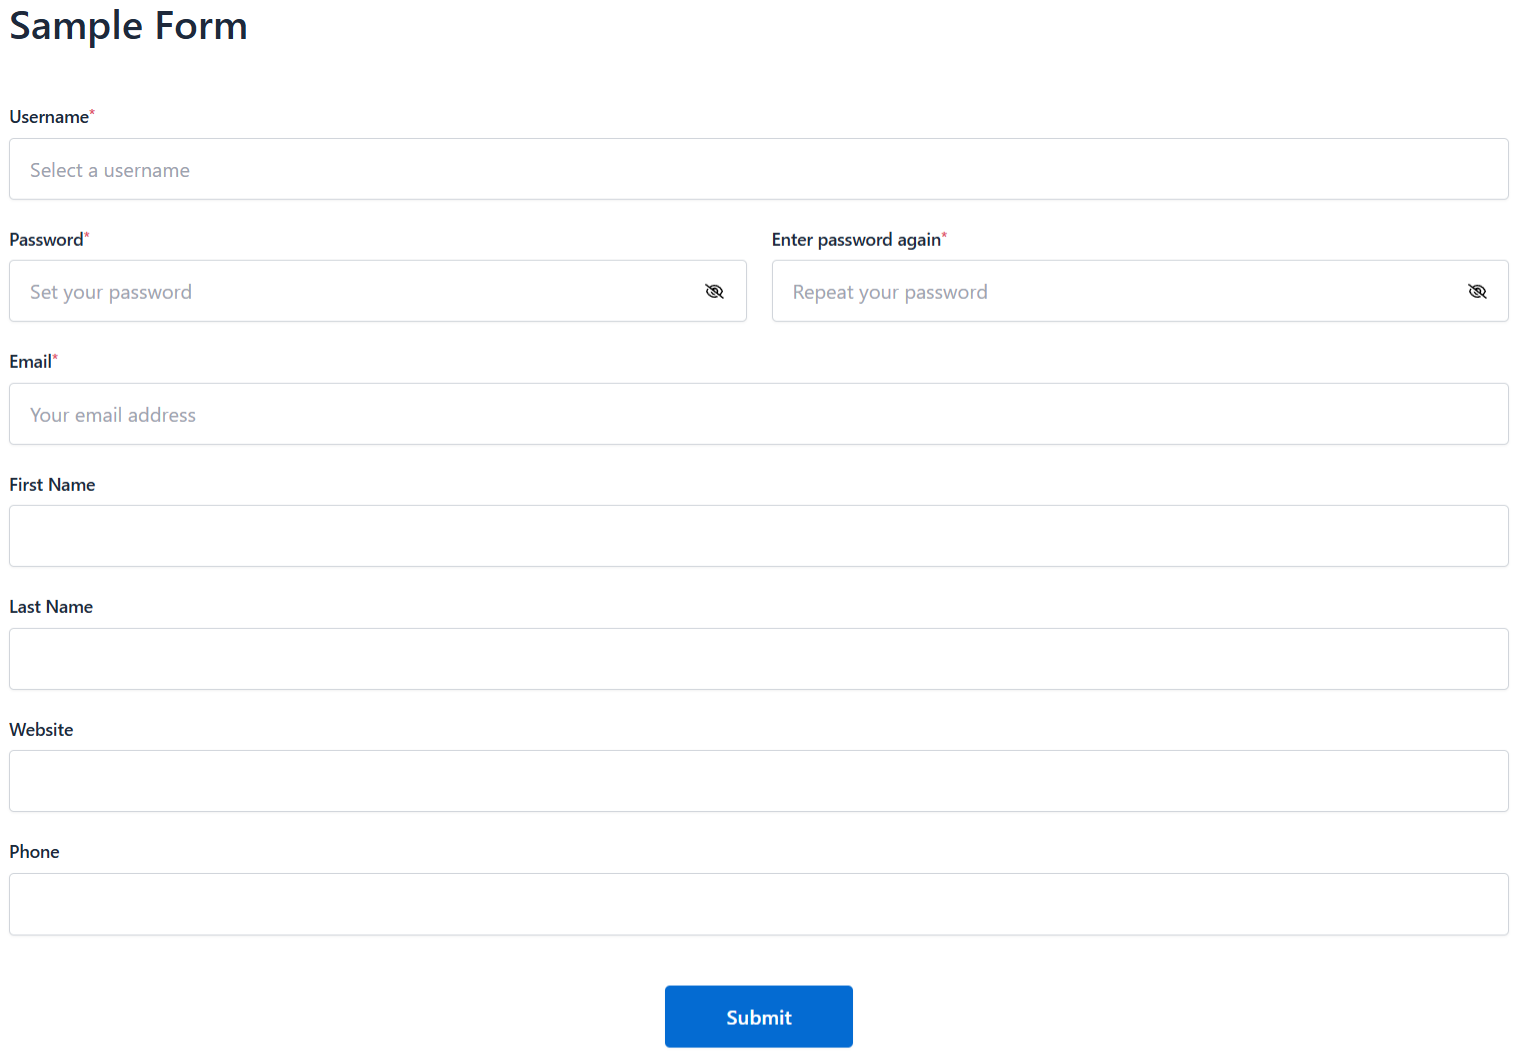
Have a good look at the fields we have on our form. Let’s quickly fill them out and then visit RegistrationMagic → Inbox inside the WP Dashboard.
It is important to learn reading this page.
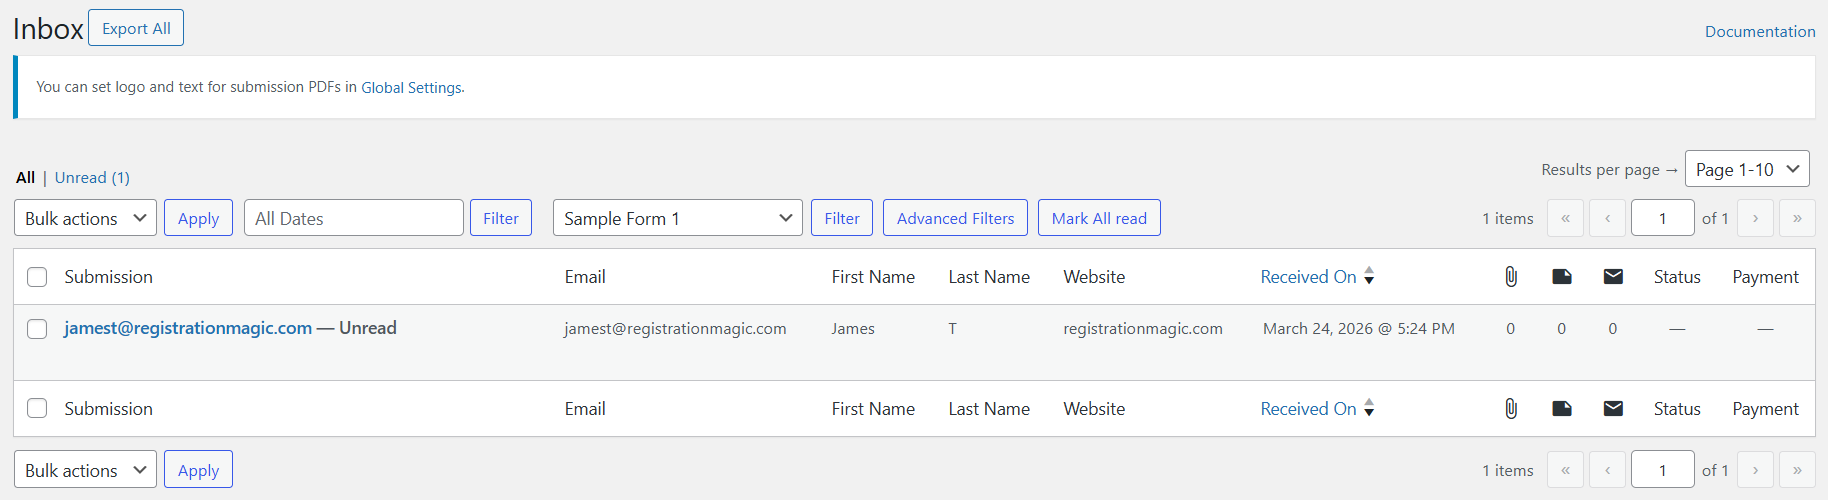
We see that submissions are recorded as a table with the user’s email as the primary link to open the submission’s details page. This is followed by each field of the form forming a column header and the subsequent submissions displaying the user entered information below. By default, only the first 4 fields and their data will be visible in the submissions table. Any more fields will make the whole table cramped, so they won’t appear here. After the form fields, we get the columns to show the submission date & time, attachments, notes, emails, custom status (if any are applied), and the payment made with the form submission.
Before we go to the submission details page, let’s check out the submission filters.

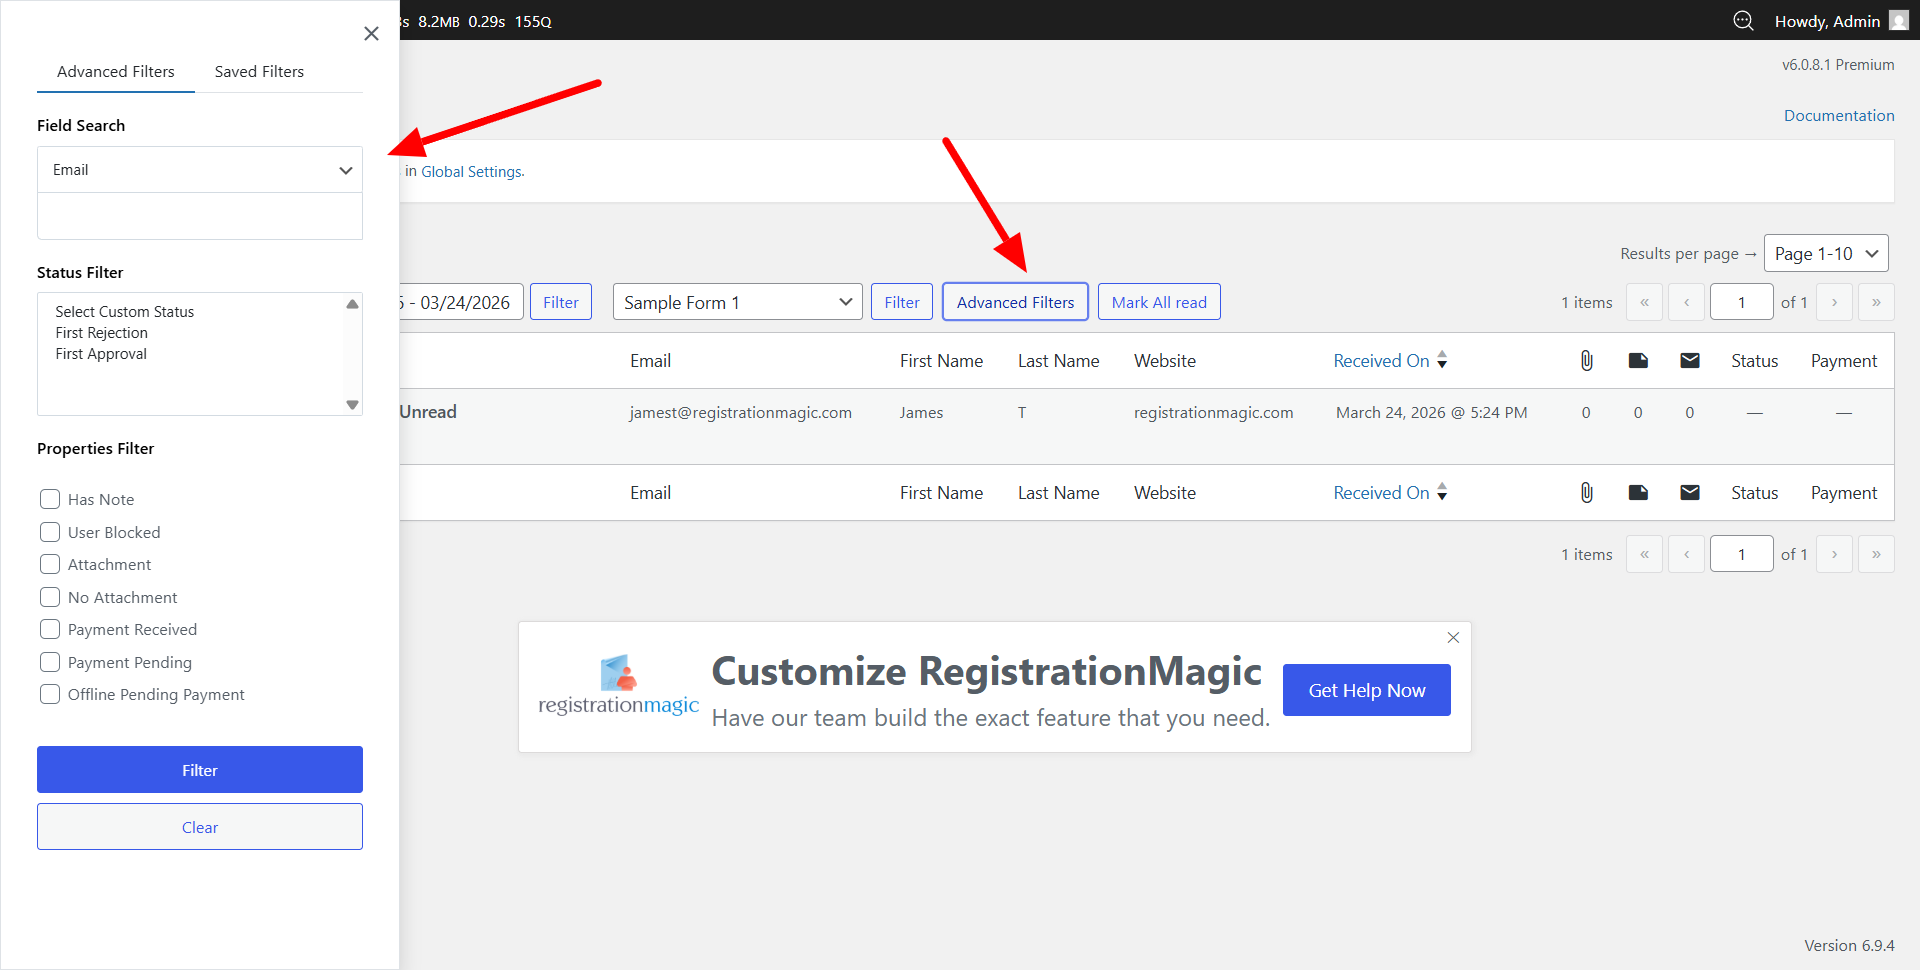
The first filter above the submissions table is helpful for filtering submissions by date. This is followed by the form filter. With this filter, we can see submissions for any particular form or submissions from all the forms together. Next one is a button that opens a set of advanced filters. Click on the “Advanced Filters” button and we can filter submissions by form field value, custom status, or from a list of properties of submissions.
Since we have a single submission right now, there is no need for filtering. However, filtering can be an essential tool when we have hundreds of submissions! Or maybe even thousands!!
Submission Details Page
When we click on a submission record, a new page displays all the record attributes neatly.
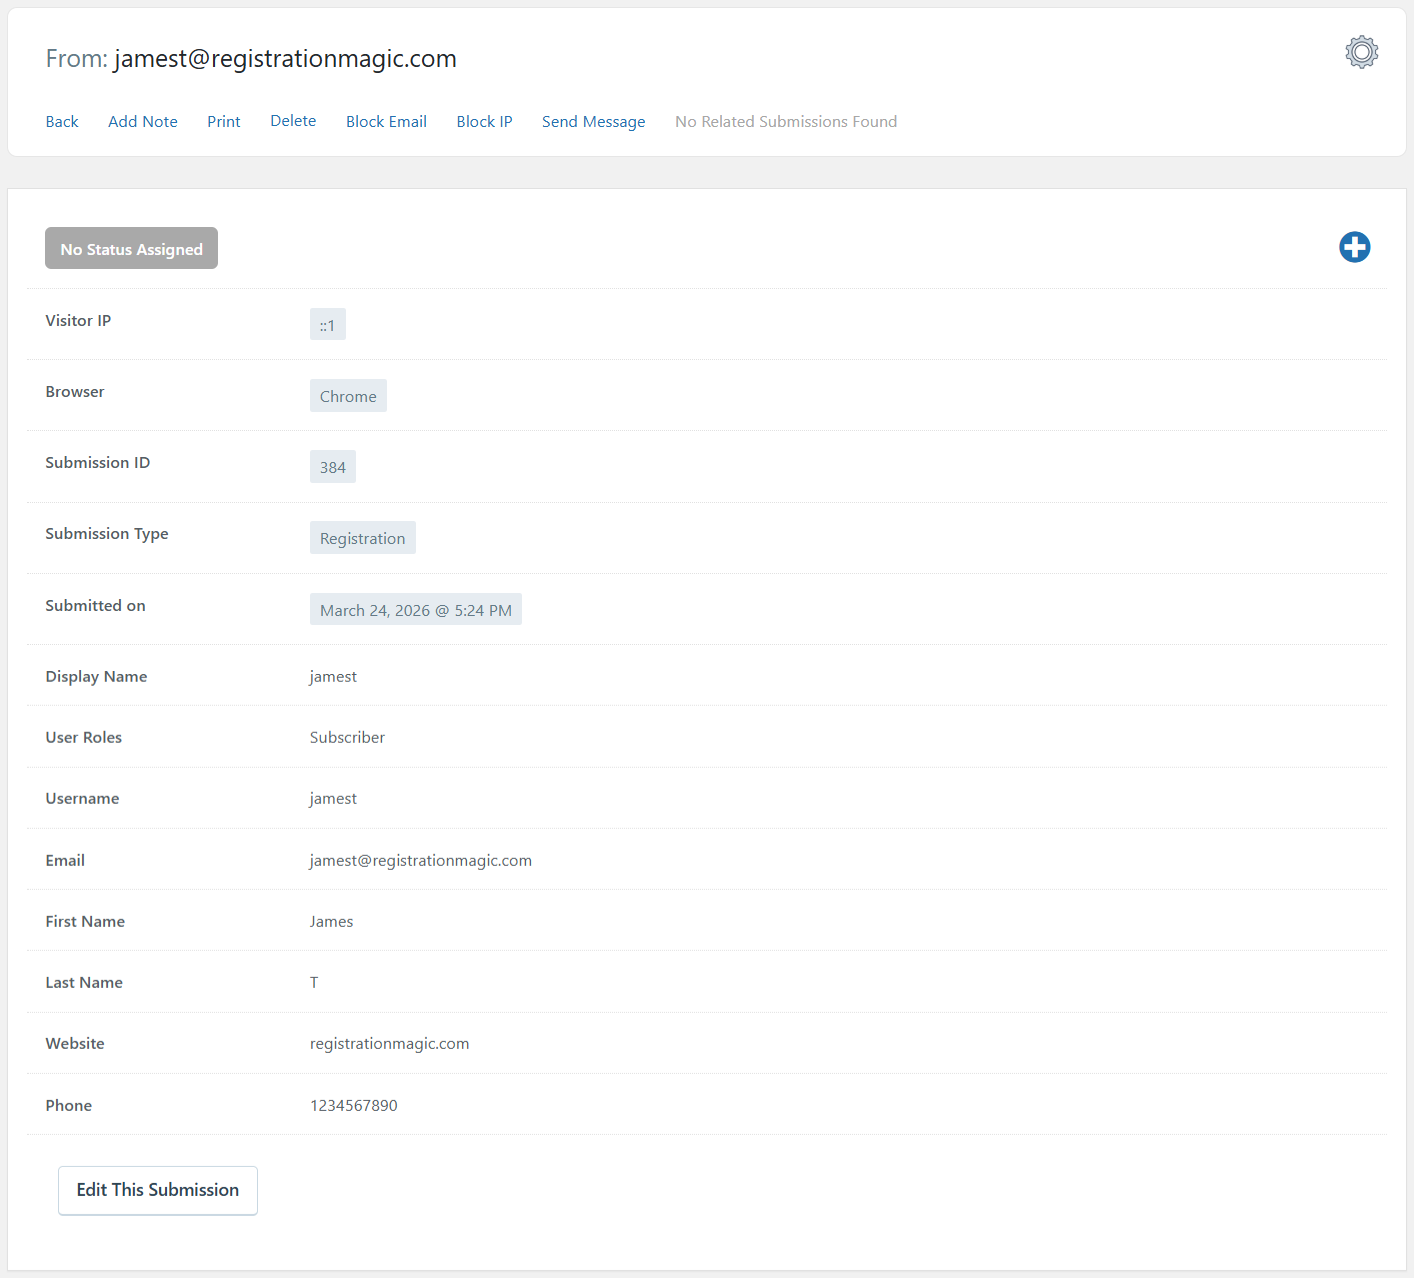
Here, we get the user’s IP and browser information at the top of the submission details. Followed by the Submission ID which is a unique number associated with each submission. Submission Type tells us if the filled form is a simple contact form or configured for accepting WordPress user registrations. We can also download the individual submission as PDF using the Print link in the menu list at the top. The PDF will also show our business logo if we have configured it in Global Settings. Handy if you want to print submission forms with your own branding.
Notes can be added to each submission for internal or external purposes. Colors can be assigned to these notes during creation. Click on the Add Note link in the menu at the top to get to the Add Note page. From there, we can add the note text, color and set whether the note will be visible to the user on their frontend profile.
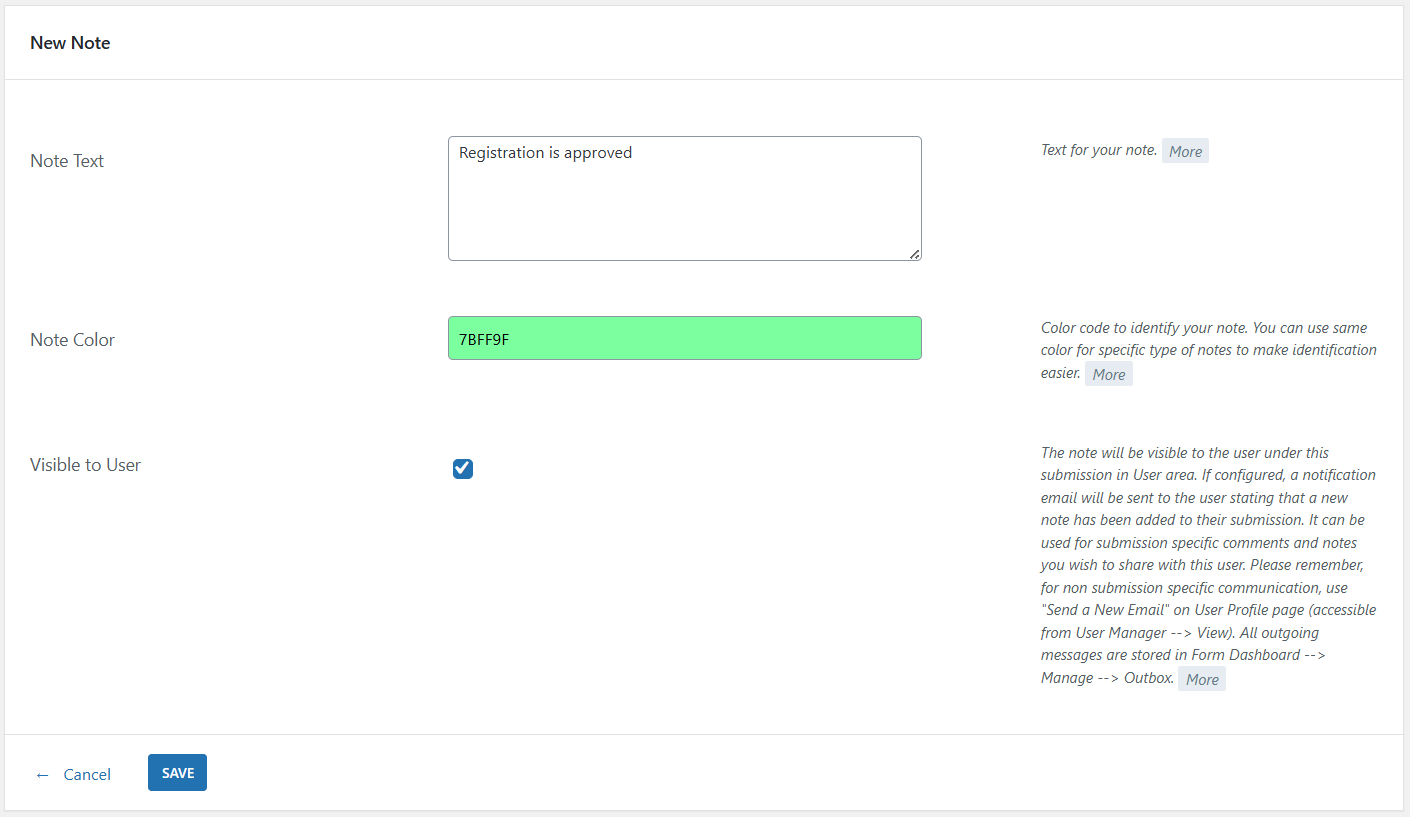
Here’s a nice little note stacked right below the submission record.
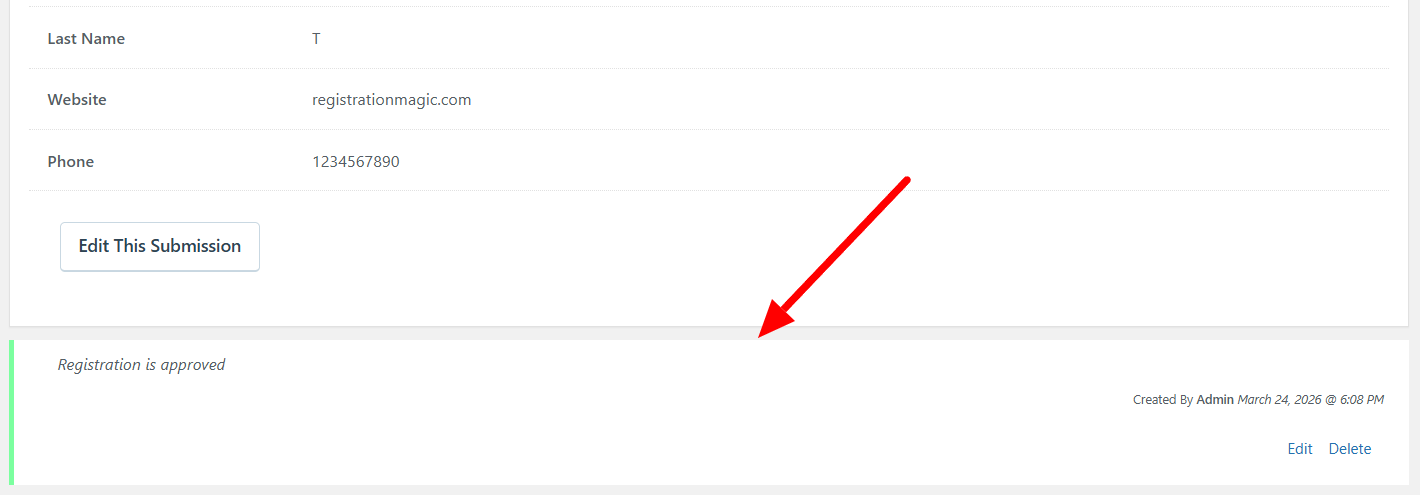
Notes can be edited later too.
Export Function
A word about the Export button on the Inbox page. It allows downloading submission records as a single CSV file. Many external programs support CSV standard for importing data. Direct connections to MailChimp and Aweber are supported out of the box, so no need to go through an extra step if you are using one of them.
This is just the beginning of things that we can do with submission records inside the RegistrationMagic plugin. We shall discuss more features in upcoming posts. Hope you can manage and export WordPress registration forms data in a better way now. Have a great day!
- How to manage and export WordPress registration forms data? - March 24, 2026
- WordPress Registration Form Required Fields – Complete Guide - March 23, 2026
- WordPress Registration Shortcodes List - March 21, 2026
- WordPress User Registration Custom Status Guide - March 20, 2026
- WordPress Payment Form Guide: Setup Payments on Registration Form - March 19, 2026
- RegistrationMagic Starter Guide - July 21, 2025
- Best 5 WordPress Event Calendar plugins for 2026 - April 2, 2025
- Experience the Unfolding Magic! - August 4, 2023
- List of Guides for WordPress User Registration Process - July 28, 2023
- Frequently Asked Questions About WordPress User Registration Forms - July 28, 2023
We have the premium version and it is not possible to export form data with RegistrationMagic in a format CSV, just a .xml. What is the solution to do it.
Please make sure you are using the latest version of RegistrationMagic. In order to export submissions, go to RegistrationMagic > inbox > export all. In case you still face any issue, please raise a ticket on our support portal here in order to allow us assist you: https://metagauss.com/help-and-support/
I am able to export form as .xml file instead of csv, how do i resolve?
If you want to export form data with RegistrationMagic, go to RegistrationMagic > inbox > export all. The submissions shall be exported in form of csv. This is a feature of premium version of RegistrationMagic. The form data however can be exported in form of .xml file.
I need to create a form that records daily mileage from a group of registered users. I then need to be able to query the database and display the user’s total miles for the year on a leaderboard page. Is it possible to query the database?
As of now, there is such option to find out records daily mileage from a group of registered users. So we are unable to provide any custom query the database.
In our submission form we have fields for street address, city, state and zip code. However, when they a exported they are all combined into one column of the Excel spreadsheet. How can we get the individual submission fields exported into individual columns.
Each field of RegistrationMagic displays in a separate column of Excel sheet. This can be downloaded with “Export All” link on inbox page. Address field is a combination of multiple sub fields such as street address, city, state, and zipcode. Since all these attributes are part of address field, they are combined into one column of Excel sheet.
Why if each element of the address is a separate field for the customer to fill in do they get combined to form one column in Excel?
I also get a number of fields like “Unique token”, “Payment Invoice”, “Payment TXN Id” that I don’t want downloaded. How do I eliminate those?
Hello, my export all button is showing grey, and i canot press it. Any advice?
The Export All button available in RegistrationMagic > Inbox, is a feature of premium version of RegistrationMagic and not available in the standard version. Please make sure you are using the premium version if you wish to access it.
I have to export users data from Premium version. The export function exports the activities, not the whole user database. How can I export the users database? Not the activities, but the data fields for all users?
You can export the submissions from RegistrationMagic > Inbox > Export All.
Please provide examples how the exported data looks. The CSV report we get Using WordPress, WooCommerce, and EventTickets is almost useless. Our event has several tickets, and the data for one person is fragmented on multiple rows. Difficult to explain.
The submissions can be exported from RegistrationMagic > inbox > export all. We can provide you example as to how it looks but will need you to raise a ticket for our support team, since comments section doesn’t allow sharing of the files.
How can i check database entry of my registered user?
User registrations are all available in “User Manager” page of RegistrationMagic’s backend.
I am using registration magic on my website but the form export as .xml file instead of csv, how do i resolve?
Thank you
In order to export in CSV format, refer to the following steps:
– Login to WordPress dashboard
– Under RegistrationMagic, click Overview menu item
– Scroll down to EXPORT option
– Select the form
– Click Submissions